Showing posts with label St. Patrick's Day. Show all posts

Saturday, March 26, 2011

Last St. Patty's Post of the Season: Food


Chance and I are threw a little St. Patrick's Day get-together/BYU v. Gonzaga viewing party last Saturday and I was really excited about the food. I made a bunch of desserts and concocted a well-themed appetizer to throw into the mix.

Desserts:
Lucky Charms Treats
Jello/Poke Cake
Cupcakes

Appetizer:
Carrots, Cauliflower, and Broccoli w/Ranch Dip

The Desserts:
I made Rice Krispy Treats but instead of RK I used Lucky Charms. Thanks to the fabulous, talented ladies at eighteen25 I used their printable and attached it to the top.


Recipe:
3 TB Margarine or butter
1 bag (4 cups) of marshmallows
6 cups of cereal

**The recipe indicated that they recommend fresh marshmallows. They do NOT recommend "diet, reduced calorie, or tub margarine."
Melt the butter in a big 'ol sauce pan over low heat. (You're going to add 6 cups of cereal, so it needs to be a big pan).
Add the marshmallows and stir until completely melted. Remove from heat.
Add the cereal and stir until well coated. Using wax paper or a buttered spoon press the mix into a 13x9 pan.
Cut into squares once it has cooled.

The marshmallows that are in the Lucky Charms added just the right amount of flavor. I'll never go back to basic Rice Krispy Treats.

Next, I made a three layer cake to mimic the Irish flag. (If you can't tell I have TOTALLY embraced their flag this year as I celebrate.) Thanks to Google Analytics I learned that someone in Belfast, Northern Ireland has stopped by my blog. I would LOVE to learn more about St. Patrick's day there, so feel free to comment!
I used a cookie cutter to guide the sprinkles into a shamrock shape.
This cake was what I call a Jello Cake and what my darling MIL calls a Poke Cake. (Can't you just hear her Southern accent wrapping itself around "Poke Cake." She's too cute.)

I bought a white cake mix. Actually, I bought two boxes. I did this because one box says it will make two 8" round pans. I needed three. I should have just spread the one mix into three pans. However, since I made two boxes, I used the left over batter and made about 12 cupcakes. Sadly the taste was really bland so the cupcakes were kind of a flop!

Now, listen. On the box it says to separate your eggs and only use the whites. Last time I didn't do this. It turns out the yolk will make your "white" cake yellow. Lesson learned: Follow directions!

I poured the batter into three 8" round pans and cooked according to directions. Then after I took them out of the oven I used a fork and poked a bunch of holes into two of the cakes. Make your jello using 1 C of boiling water and 1/2 cup of cold water. I poured the orange jello on one cake, the lime on another, and I left the last one white. Let this cool for about three hours.

I placed the Orange on bottom and frosted the top with cool whip. Next the white, and finally the green. Then frost the whole thing in cool whip. Now when you cut, it looks like the flag. Oh, and it's delicious.

I normally make this in a 13x9 pan with strawberry jello. It is always a hit. Always.

As for the appetizers:
Following my Irish flag inspiration, I laid the broccoli, cauliflower, and baby carrots out on a platter in their individual color groups. I placed the ranch dressing right in the middle of the cauliflower since it, too, is white. I set it on the table and before I could get a picture people were digging in. I'm not too sad; it was just a really successful appetizer! You can imagine it though; I've given you more than enough images of Ireland's flag!

Since this was something of a potluck our friends brought some pretty amazing things too.

Jill made an ice cream cake with mint chocolate chip ice cream. (In my family that's called Grasshopper Pie). She was in the kitchen cutting pieces for people all night long!

Britni made some delicious chocolate cupcakes with green frosting. (Her husband cooks and she makes desserts. They NEVER disappoint!)

And the piece-de-resistance, the show-stopper, the "oh my gosh HOW did you DO that?!" was the Leprechaun Trap Cake made by TMJ. She saw the tutorial on Not Martha, and decided that she had to try it.


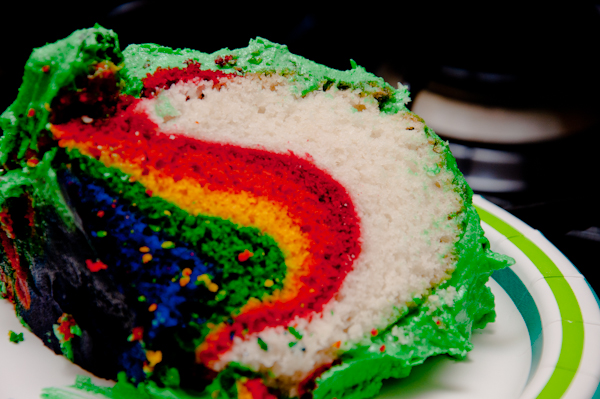
Making this cake was quite an adventure and I desperately hope that she blogs about it. If she does; I won't let you miss it! If she doesn't, I'll be sure to tell you the story later on!

Thursday, March 17, 2011

TMJ's take on Pot O Gold

You may have noticed that I do a ton of craft projects with my dear TMJ. I <3 her. Anywho, I wanted to show you how she took the Pot 'O Gold and made it uniquely her own.

Pot 'O Gold:


You have to remember that she is a seamstress. So she has enough fabric to start her own store. It made so much sense for her to make her rainbow out of fabric instead of painting one. Unfortunately, we live in apartments that have very little natural light, so my pictures are always heavy on flash. For that, I apologize.


I really need to show you here holiday blocks. Actually, I have a key to her place...I could just sneak in and take a few pictures. Hmm. I'll get back to you on that. :)

We were apparently blogging at the same time. That's how we roll. Anyway, here is the link to her blog post about the same subject.

Saturday, March 12, 2011

Flameless Luminary Redo

Febreze has this cool product called a Flameless Luminary. It is a very Asian inspired air freshener/LED candle.


The air freshener portion is scented paper. You can buy different scents and they come in various patterns. I bought the luminary starter kit on clearance, with a coupon. It was awesome. Then I got the refills at my local grocery store. For some reason they had a TON on clearance. I bought the Willow Blossom scent for two reasons. 1. I like the scent. 2. The paper is plain white.

I have gotten different scents/patterns in the past but I might be fully converted to WB. Here's why:

I got out a new luminary refill and some shamrock stamps.


With ten minutes and a little green and orange ink I got this:


Side 2:

Side 3:

and Side 4:

As you can see, I didn't go in with a plan. Three of the sides are really similar. Side 3 was kind of a fail because of the texture on the paper, but I just put it in the back! Always a bright side :D

I turned the light on for the pictures. I feel like it blanched out the color of the orange. Here it looks yellowy but it really is straight-up orange. I also "hid" only one four leaf clover on the whole thing.

Here's a view with two sides visible. An extra treat for the readers ;)

Friday, March 11, 2011

Floral Flair

So...I have had this lingering feeling that my decor is incomplete. That probably has something to do with the fact that I bought a cute little lamb at HomeGoods. I thought, "March comes in like a lion and goes out like a lamb! AND THEN I can have the lamb and the lion for Easter too. Brilliant!" I have still yet to find a lion. So for March at least, the lamb doesn't make sense. So I decided to try my hand at flower arranging! A nice bouquet would fill that gap nicely. Here's how it went down.

The supplies:
A vase, scissors, floral tape, a ribbon, orange flowers, white flowers, and a big green flower


I recently learned this trick from a friend:
Add floral tape to the vase in a grid pattern. This will help you organize the flowers AND it will keep them in place. This makes for much prettier arrangements than just putting the flowers in the vase.


Initially I wanted to arrange the flowers to look like Ireland's flag, but I didn't have enough green. So I stuck the green one in the middle and cut the stem so it would be a little taller than the rest. Then I went in with the orange. I got one stem on each "side" of the vase. Then I filled the holes in with white.


Here is a picture with my homemade Irish flag. I tied the green ribbon around the vase but I couldn't manage to get you a decent picture!


This arrangement will make an appearance on Chance's Photography blog.

Monday, March 7, 2011

Pot O' Gold Before and After


For St. Patrick's Day I have had a vision of a fantastic little pot of gold. I searched high and low trying to find just the right pot. I've been everywhere! I literally almost bought a black cereal bowl. I started getting a little desperate. Thankfully I took TMJ to Joann's. In the garden pots they had a very small version of EXACTLY what I wanted. It was just tiny! She had the vision to look at the larger ones with fresh eyes. We decided to paint the larger ceramic pots black!

I found this pretty little number at 30% off. I paid $6. I actually like her just the way she is but, alas, sacrifices have to be made.

TMJ got one too in a slightly different style. Her's was a dark blue to begin with so that made the process a little easier.

We bought a big bottle of black acrylic paint for $2 and a bottle of "Glass and Tile Medium" it was $2.50 but I used a coupon :) The Glass and Tile Medium is crucial. If you don't use it, the paint won't stick to the pot. You can buy paint that basically has the medium already mixed in but it is more expensive and smaller. I will use the black paint for way more projects and by buying them separately we were able to paint three pots.

Here is the set up. As always, on my multi-purpose room floor.

The instructions say to clean the surface with alcohol before painting. Don't forget this step! After it is cleaned, you apply one coat of the medium. We found that it was bubbly. That may have been because we used sponge brushes. I made sure to get plenty of the medium on the pot and then smoothed out the bubbles with my brush. It took patience but it was worth it. Then you let that thoroughly dry. (We ate dinner with the boys and watched a little TV before checking on the progress.)

After the medium is dry, you can apply your first coat of paint.

Here is the lovely TMJ painting her pot. Mine is in the foreground.

A close up of our little lady after just one coat of black.

I decided to throw in the leprechaun to reinforce the vision. I really like the style of TMJs pot but it was just a little too small for me. It will be the perfect cauldron come October!

I patiently applied a second, and later a third coat of black paint before finishing the process with a second coat of the medium. The instructions ask you to allow the medium to cure for 2 weeks (as opposed to baking). Since we aren't exactly eating out of the pot I allowed it to cure for two days before adding the gold.

I added a little craft foam to the bottom and then covered it with gold beads and gold pirate coins I got at the dollar store. Later I bought a bag of bite sized Twix (They are wrapped in gold and are Hubby's fave!) and added those to the top. Target had gold wrapped chocolate coins but they were pretty expensive.

I finally added a rainbow to the whole set up by using water colors to paint an 8x8 canvas. Since I have no mantle the whole set up is on my favorite piece of furniture, our lowboy.

The pot of gold looked cuter when gold showed over the top but for some reason all the Twix have disappeared!

I'm linking up to Thrifty Decor Chick's Before and After Party.


And Women Who Do it All's Spring Mantel Party!

And Funky Polka Dot Giraffe's Too Cute Tuesday!

Tuesday, March 1, 2011

Multi-Purpose Room

Do any of you remember the term Cafe-Gym-Atorium? It was the word that we used before "Multi-Purpose Room" came into vogue. Well, when you live in a small, two-bedroom apartment you find ways to make rooms and decor serve multiple purposes.

Chance took a picture of my friends and I crafting the other night. We are on the floor of our second bedroom, in between two desks and a futon. I can't wait until I have a garage!

When I buy things I have to think hard about where we can store it. So if I can make one item serve multiple holidays it can more easily earn a coveted place in my closet.

I recently bought this pot to be used as the pot of gold for St. Patrick's Day. It will also serve as a cute little cauldron for Halloween! It took me forever to find just the right pot. Actually, I never did. I had to paint this one. It was quite the adventure. You'll hear all about it soon!


A Wee Bit of Irish

Here's a sneak peak at our St. Patrick's Day Decor. Remember the box of wood blocks I bought at Christmas time? A little paint, mod podge and scrapbook paper turned them into fun Valentine's decor. Well those same tools turned the back sides into St. Patty's day decor!
I wrapped one block in some ribbon to replicate the flag of Ireland.


Then I used the exact same techniques as last time to create a little luck!

LinkWithin

Related Posts Plugin for WordPress, Blogger...